Waveform Editor
The Waveform Editor presents all the content that can be found within the sad.xml file in an editing environment designed for ease of use.

Waveform Editor
To open the Waveform Editor, double-click a Software Assembly Descriptor (SAD) file from the Project Explorer view. The Waveform Editor contains an Overview, Properties, Components, Diagram, and a raw XML tab, which contains the SAD file content.
Overview Tab
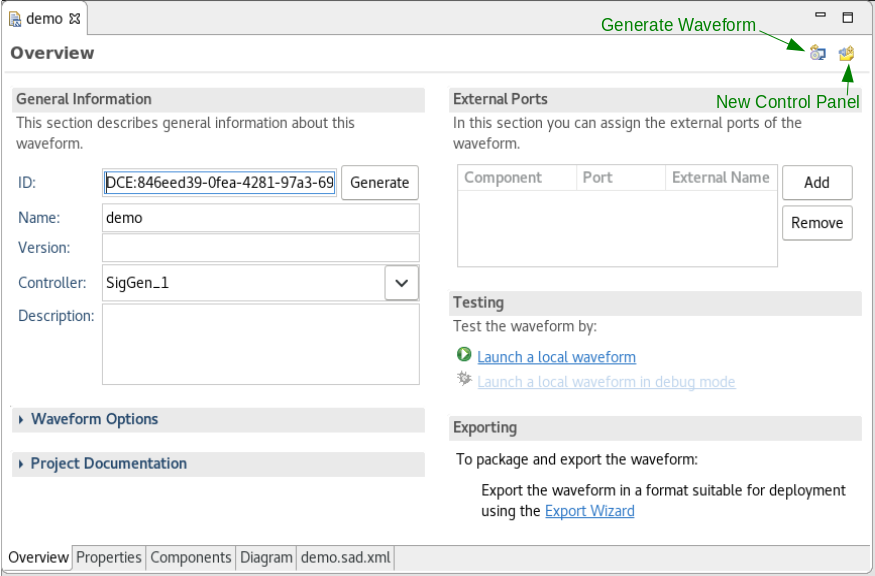
The Overview tab provides general information about the waveform and hyperlinks to additional waveform-related sections within the IDE.

Waveform Editor Overview Tab
The Overview tab contains the following sections:
The General Information section provides controls to set the ID, Name, Version, Controller and Description for the waveform.
The Waveform Options section provides controls to add, edit, and remove the
STOP_TIMEOUTandAWARE_APPLICATIONoptions for applications in the SAD file.The Project Documentation section displays a Header hyperlink, which if clicked, provides the option to create and edit the file “HEADER” in the project. When code generation is performed, the header is applied to your project files.
The External Ports section provides the ability to promote a component’s port so it is accessible from the waveform object. By default, an external port name is equal to the name of that port within the component, but the external port can be renamed.
To change the external port name:
In the External Ports section, locate the port and click the cell in the External Name column in the port’s row.
Enter a new value for the name.

Renaming External Ports
Press Enter.
The Testing section allows for the launching of local waveforms. A local waveform does not require a running Domain or Device Manager and executes within the sandbox. A local waveform is similar to launching an individual component in the Chalkboard and constructs the waveform within a new Chalkboard instance. You may launch additional components into the waveform running in the Chalkboard using the palette. These newly launched components have standard runtime actions (Plot, Start, Stop, Terminate, and Connect) available. When the local running waveform is released these newly launched components are not saved in the waveform.
The Exporting section provides a hyperlink to the Export Wizard, which steps through the process of deploying the waveform into the SDRROOT.
Properties Tab
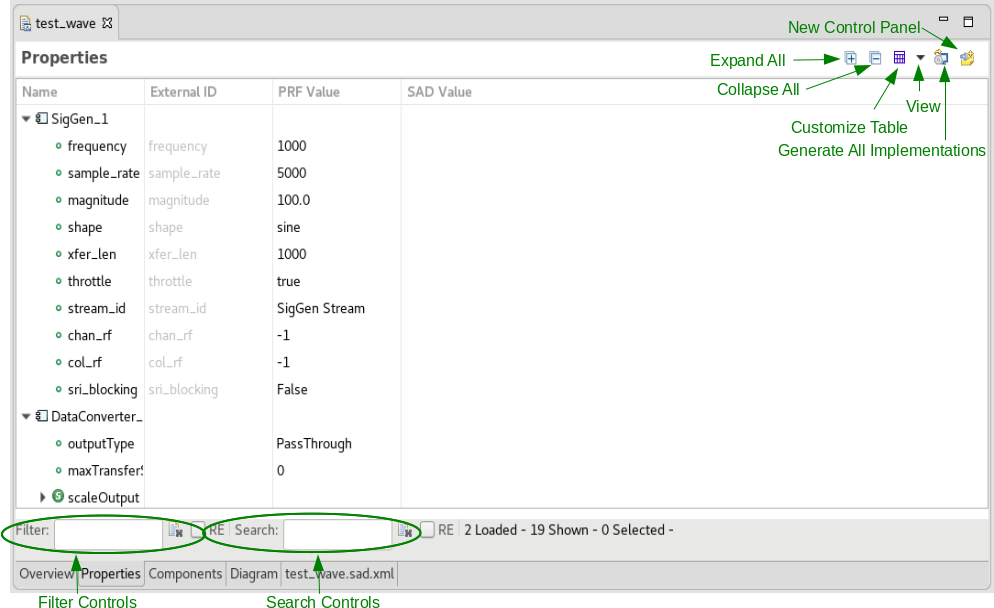
The Properties tab provides access to the component’s properties within the waveform.

Waveform Editor Properties Tab
Within the Properties tab, you can:
- Assign an external property ID
- Set the overridden value within the SAD file
- Filter and search for properties
- Compare the overridden value to the original Properties File (PRF) value
The properties of the component designated as the Assembly Controller are always accessible externally and are grayed out in the Properties tab. Additional properties may be assigned an external ID, which allows for a particular component’s property to be designated as accessible to external waveform objects. See External Properties for additional information.
To make a property external:
Select the Properties tab of the application’s SAD file.
Edit the External ID field by entering the desired ID.
The external IDs must be unique. They can not duplicate another external property’s ID, or the ID of a property belonging to the assembly controller.
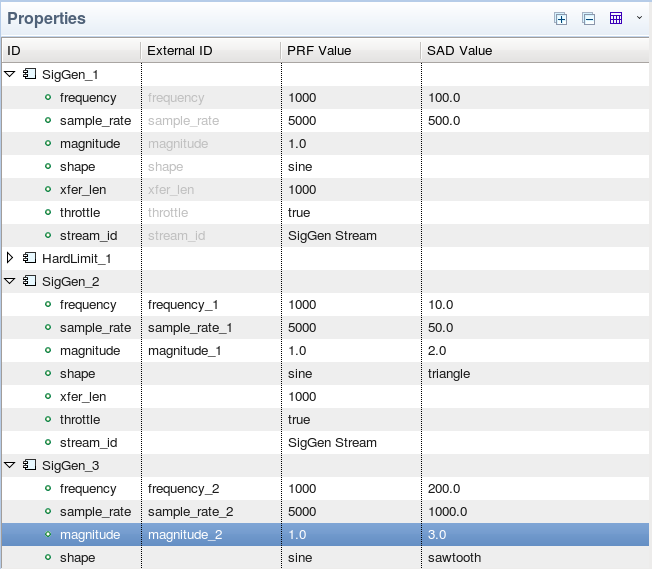
The following sample Properties tab displays several properties with assigned external IDs and several properties with SAD values set to override their PRF values.

Waveform External Properties
Diagram Tab
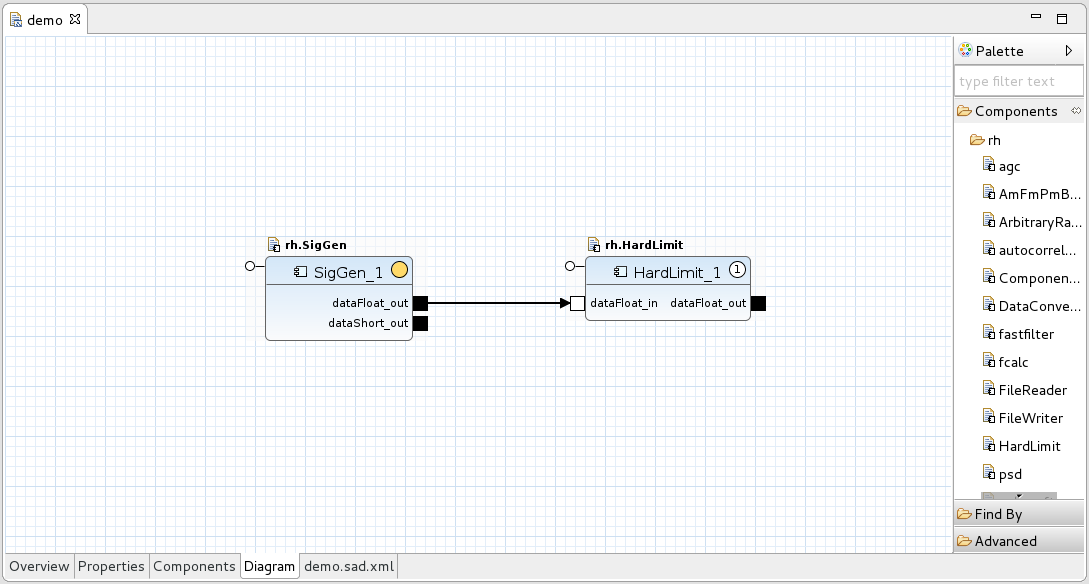
The Diagram tab is used to place components into a waveform, connect components together, set waveform-specific properties for components, make a port external, and add a usesdevice relationship to a FrontEnd Tuner device.

Waveform Editor Diagram Tab
To zoom in and out on the diagram, press and hold Ctrl then scroll up or down. Alternatively, press and hold Ctrl then press + or -.
To add a component to the waveform and configure its properties:
- Drag the component from the Palette onto the diagram.
- Right-click the component.
- Select Show Properties
- From the Properties view, change the desired properties.
- Press
Ctrl+Sto save the changes.
If you want to quickly locate a component in the Palette, you can replace the text type filter text in the text field at the top of the Palette with a keyword to filter the component list.
Any property modified here is specific to this waveform and does not impact the component’s execution in other environments.
To make a port external:
Left-click the port you want to make external, to gain focus on the port.
Right-click the port to open the port context menu.
Select Mark External Port.

Mark External Ports
From the Diagram tab, a user may also use the Find By feature. The Find By feature enables a user to find a resource by name, a service by name or type, or an event channel by name.
Connections may be made from input to output ports by clicking and dragging from one port to the other. Multiple connections can be drawn to or from ports. Any unsupported or erroneous connection that the IDE can detect is marked with an appropriate indicator. Hovering over the indicator provides information concerning the error.
To add a dependency on a FrontEnd Tuner device that the waveform needs to use at runtime (a usesdevice in the XML):
From the Palette, in the Advanced folder, select Use FrontEnd Tuner Device and drag it onto the diagram. The Allocate Tuner dialog is displayed.

Select Target Device
Select the FrontEnd Tuner device you want to use. This will complete some of the information in the subsequent wizard pages. Alternatively, select Generic FrontEnd Device for defaults. Click Next.

Allocate Tuner
Enter the Uses Device ID and optionally, enter the Device Model, and then click Next.
Enter the appropriate information and click Next. For more information, refer to Allocating a FrontEnd Tuner.

Identify Ports
Enter the names of any uses and provides ports that you want to use from the target device and click Finish. The Use FrontEnd Tuner Device is displayed in the diagram. When you launch the waveform, the FrontEnd Tuner device must be available in order for the waveform to run.
The
sad.xmltab displays the raw XML data, which describes this waveform fully. Although not recommended, manually editing the XML file is supported.
 REDHAWK