SoftPkg Editor
The SoftPkg Editor presents all the content that can be found within the spd.xml file in an editing environment designed for ease of use.

To open the SoftPkg Editor, double-click a Software Package Descriptor (SPD) file from the Project Explorer view. If the SPD file references a Properties File (PRF) or Software Component Descriptor (SCD) file, additional tabs are made available that represent these files in similar fashion.
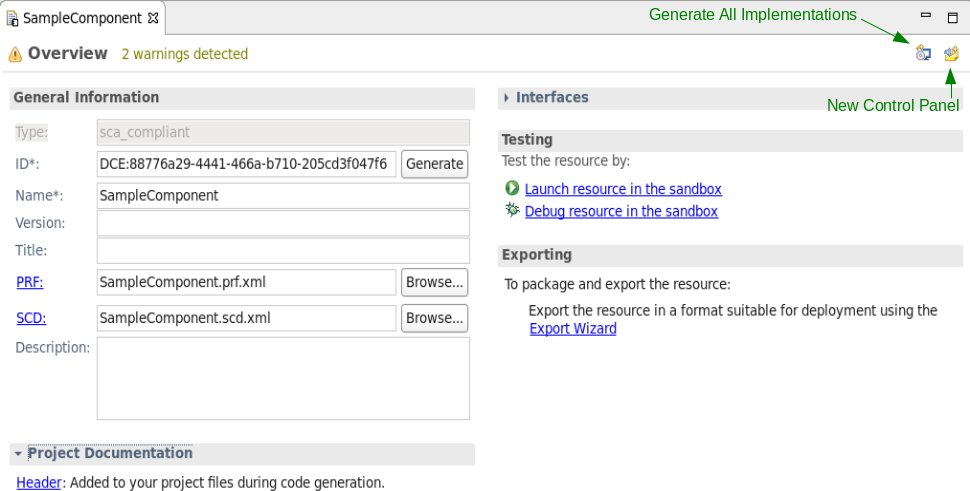
Each of the editor tabs, with the exception of the raw XML tabs, have the following buttons located in the top right corner:
Generate All Implementations Button: This button is used to generate the code implementation of the SPD file. The generated code is based on the code generator template that was chosen during the New Project Wizard and content found in the SPD, PRF, and SCD files.
NOTE
Code generation is not exhaustive, and custom port types may not compile.New Control Panel Button: This button is used to generate a new control panel.
The SoftPkg Editor is organized into four main tabs:
- Basic information about the SoftPkg can be edited from the Overview tab
- Properties and messages can be edited from the Properties tab
- Ports can be edited from the Ports tab
- Implementations and code generation settings can be edited from the Implementations tab.
The following sections describe each of these tabs.
Overview Tab
The Overview tab is a representation of content found in the SPD file and contains five sections:
- The General Information section provides the ability to view and set (if write permissions are granted) the resource's ID and Name as well as the location of the PRF and SCD files. The initial content of these fields is auto-generated when the project is created and is generally left unaltered. The optional fields, Version, Title, and Description, may be set to aid in the project's documentation.
- The Project Documentation section displays a Header hyperlink, which if clicked, provides the option to create and edit the file "HEADER" in the project. When code generation is performed, the header is applied to your project files.
- The Interfaces section lists the Interface Description Language (IDL) interfaces that this resource inherits. This includes IDLs used by the resource's ports, lifecycle, and properties. This table is read only, and additional IDL interfaces cannot be added here.
- The Testing section displays two hyperlinks. Launch resource in the sandbox launches a local instantiation of this resource within the sandbox. Debug resource in the sandbox provides additional runtime control, including the ability to place breakpoints, pause execution, and inspect and modify variables. See Debugging REDHAWK Components and Devices with Eclipse for more information.
The Exporting section provides a hyperlink for deploying a project to the SDRROOT. Use the following procedure to export a project using the Export Wizard:
- Click Export Wizard.
- Select the projects to export.
- Type or browse to the export location.
- Click Finish.
Properties Tab
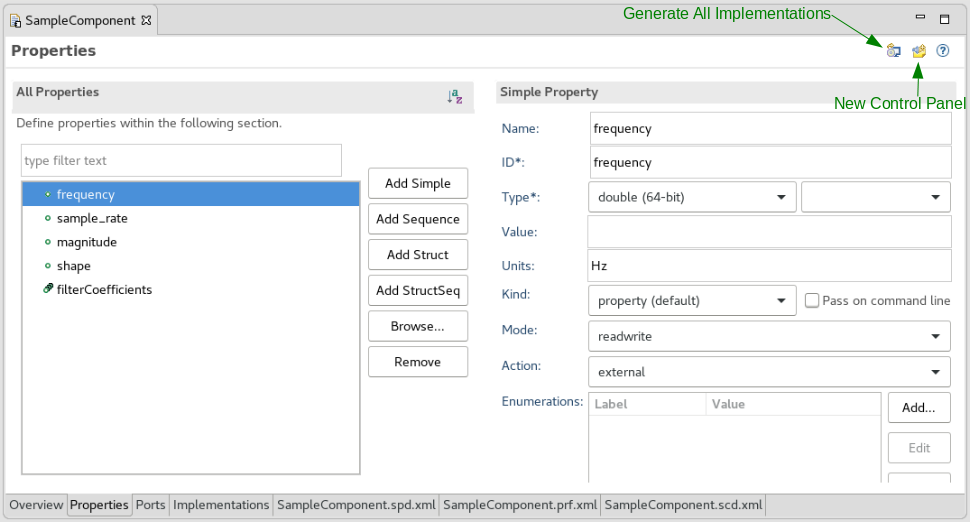
The Properties tab provides a view of all of the properties defined for a component or device.

Within the Properties tab, the All Properties section displays all of the properties defined for the selected component or device.
To add a property, click on one of Add Simple, Add Sequence, Add Struct or Add StructSeq to create a new property of the corresponding type. To remove a property, select it in the All Properties section and click the Remove button on the right. To clone existing properties, click Browse... and select from items in the SDRROOT, projects in the workspace, or well-known properties. In addition to creating a new property from scratch, a user may also copy an existing property from a deployed resource:
- In the All Properties Section, click Browse....
- Expand Target SDR.
- Drill down to and select the desired property.
- Click Finish.
When a property is selected in the All Properties section, a type-specific details section appears on the right-hand side of the tab. All property types include a few common fields:
- Name is optional, but if given, is favored over the ID for generated code.
- ID is an identifier that is unique from all other properties within the component or device. It must be used when accessing the property via APIs.
- Kind describes the intended use of the property. The default is
property. - Mode determines whether the property can be read and/or written. The default is
readwrite. - Description is optional; it documents the intended use of the property. User interfaces may present the description as help text.
Nested properties -- fields in a struct, or the struct definition for a struct sequence -- do not include Kind or Mode. The parent property determines these fields.
The Simple Property details section includes additional fields:
- Type describes the basic data type of the property (e.g.,
float). For complex numeric types, selectcomplexin the combo box next to the type. - Value is the initial value for the property. If not given, the initial value is undefined.
- Units is strictly informative, but may be displayed in user interfaces.
- Enumerations is a mapping of human-readable string labels to values. User interfaces may use the enumerations to present the labels in place of values.
- Action is only applicable to properties with a kind of
allocation. - Range, if enabled, sets optional lower and upper limits on the value. The range is not enforced by generated code; however, user interfaces may choose to enforce it.
Ordinarily, properties are set to their initial value via a call to the component or device's initializeProperties() method. However, for certain use cases, simple properties may receive their initial value on the executable command line by enabling the Pass on command line checkbox, located next to Kind.
In the Simple Sequence details section, the fields Type, Units, Action and Range are identical to those for simple properties. The default value of a simple sequence property can be viewed or edited via the Values list.
The fields that make up a struct property are displayed as children of the struct in the All Properties section.
- To add a field, right-click the
structin the All Properties section, select New and then select one of Simple or Simple Sequence. - To remove a field, select the field in the All Properties section and click Remove.
The default value of a struct property is the determined by the default values of its fields.
NOTE
If any field has a default value, all fields must have a default value.
The default value of a struct sequence may be viewed or edited via the StructValue section in the Struct Sequence Property details section.
The struct definition appears as a child of the struct sequence in the All Properties section. It may be modified in the same manner as a struct property.
Ports Tab
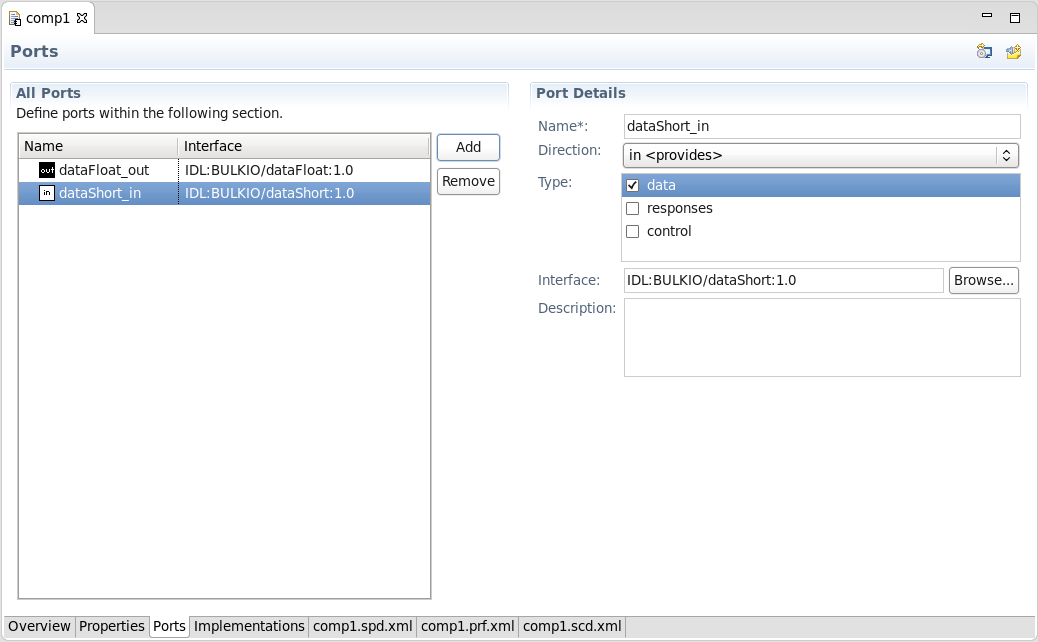
The Ports tab provides the ability to add, edit, and view port information.

Click Add to create a new port with default values. The Port Details section shows the new port, which can be modified as needed:
- Give the port a Name unique to this component or device.
- Select a Direction: either input, output, or bidirectional.
NOTE
Only Message Consumer ports should be bidirectional.
- The Type is optional and strictly informative. A port may have one or more type, defaulting to control if none is selected.
- Select the IDL Interface that this port implements. Click Browse... to open the selection dialog.
NOTE
By default, the interface selection dialog only shows the most common interfaces used in REDHAWK. Select the Show all interfaces checkbox to show the complete list for IDL interfaces within the Core Framework's (CF) install location.
- Optionally, enter a Description of the port, such as its intended use.
An existing port may be edited by selecting it from the All Ports section and changing its options via the Port Details section.
To remove a port, select it from the All Ports section and click the Remove button.
Implementations Tab
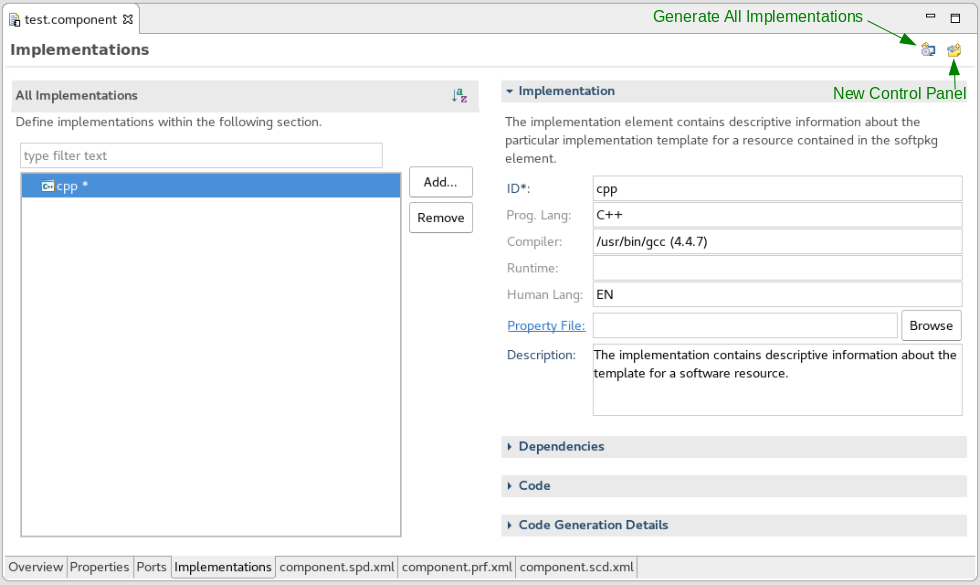
The Implementations tab is a representation of content found in the SPD file. It describes the programming language implementations that are generated and the hardware dependencies required for this resource.

During the New Project Wizard, the initial programming language and code generation template were selected. In the All Implementations section there is the option to add additional programming language implementations.
The right portion of the editor is context sensitive, and displays the information pertaining to the selected implementation.
- The Implementation section defines the compiler for the selected language and provides a custom description for this implementation.
- The Dependencies section provides the opportunity to place limitations on a resource so that it may only execute on a suitable device. This is done through the use of property dependencies. A resource's execution may be limited to a particular device by placing a dependency on a device's property. To provide compatibility among different sets of users, well known properties have been created, including different OS and processor types. The OS and processor dependencies sections contain a preset list of properties to select from.
- The Code section indicates the local file name, priority, and executable for the implementation.
- The Code Generation Details section contains configuration values for the implementation's code generation. This includes the code template used, output folder location and code generator properties.