Message Consumer
A message consumer may be created when creating a new component or editing an existing component. After creating a message consumer, you must register your code to receive a message from the port. The following procedures explain how to create a message consumer and register code to process messages.
Creating a Message Consumer
Use the following procedure to add a message consumer port to a component or device using the REDHAWK IDE.
From the Project Explorer View, double-click the component’s Software Package Descriptor (SPD) file.
The Component Editor is displayed.
From the Component Editor, select the Properties tab.
The Component Editor Properties tab is displayed.
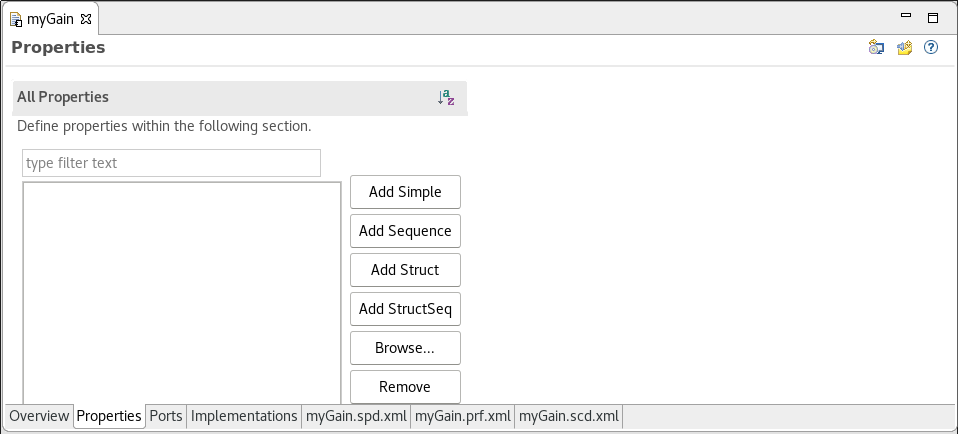
Component Editor Properties Tab
To add a
structproperty, click Add Struct.The Struct Property section of the Properties tab is displayed.
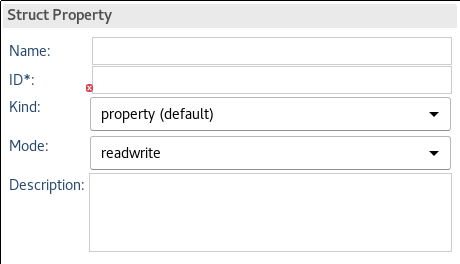
Struct Property Section of Properties Tab
In the Struct Property section, enter the name of the message you want the component to consume. The ID defaults to the name you enter.
From the Kind drop-down, select
message.In the All Properties section, select the
structproperty you added. By default, asimplemember already exists. You can modify it and create additional members for thestructproperty. For more information about property structures, kinds, and types, refer to Managing and Defining Properties. After you modify and/or create them, the members of the structure and corresponding property information is displayed.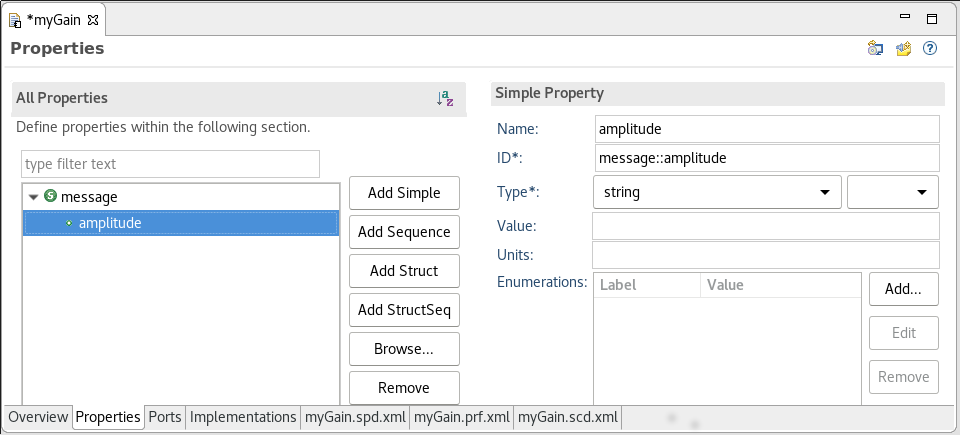
Struct Property and Members
Select the Ports tab, click Add, and in the Name field, enter a name.
In the Port Details section, in the Direction drop-down, select
bi-dir <uses/provides>.Next to the Interface field, click Browse.
The Select an Interface dialog is displayed.
From the list of interfaces displayed, select
ExtendedEvent> MessageEventand click OK.The message consumer port information is displayed.
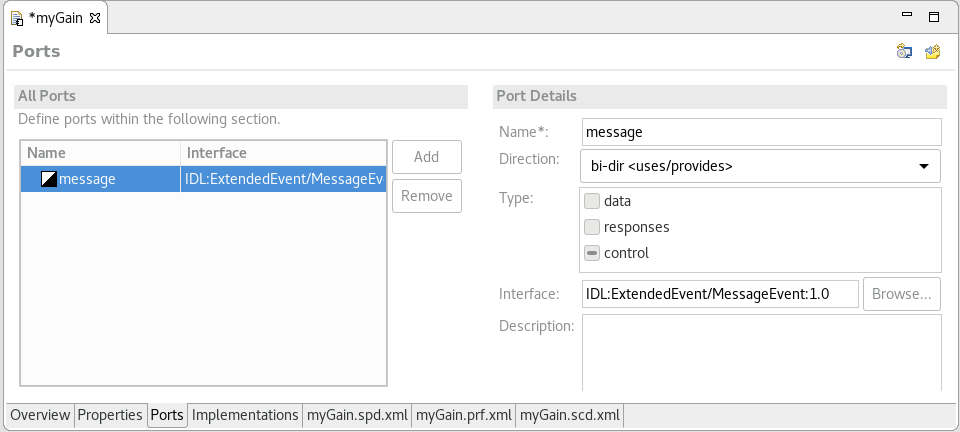
Message Consumer Port
Regenerate the component.
A bidirectional port is required to support connections to an event channel and a message supplier’s output (uses) port. In point-to-point connections, the port behaves like a provides port. In connections with an event channel, the consumer behaves like a uses port.
After creating a message consumer, you must register your code to receive a message from the message consumer port.
Registering for Messages
The following examples explain how to register code in C++, Java, and Python to process an incoming message.
For the purposes of the following examples, assume that the structure is as follows:
- id:
foo - Contains two members:
- name:
some_string, type:string - name:
some_float, type:float
- name:
- The component’s uses/provides port is called
message_in - The component’s callback function for this message is
messageReceived() - The component’s name is
message_consumer
If a connection exists between this component and either a message producer or an event channel, the following code examples process an incoming message.
Any message that comes in with the property ID foo will trigger the callback function messageReceived().
C++
Given the asynchronous nature of events, a callback pattern was selected for the consumer.
In the component header file, declare the following callback function:
void messageReceived(const std::string &id, const foo_struct &msg);In the component source file, implement the callback function:
void message_consumer_i::messageReceived(const std::string &id, const foo_struct &msg) {
  LOG_INFO(message_consume_i, id<<" "<<msg.some_float<<" "<<msg.some_string);
}
In the constructor() method, register the callback function:
message_in->registerMessage("foo", this, &message_consumer_i::messageReceived);Java
Java callbacks use the org.ossie.events.MessageListener interface, which has a single messageReceived() method. The recommended style for Java messaging is to define the callback as a private method on the component class, and use an anonymous subclass of MessageListener to dispatch the message to your callback.
Add to the list of imports:
import org.ossie.events.MessageListener;Implement the callback as a method on the component class:
private void messageReceived(String id, foo_struct msg) {
  logger.info(id + " " + msg.some_float.getValue() + " " + msg.some_string.getValue());
}
In the constructor() method, register a MessageListener for the message to dispatch the message to your callback:
this.port_message_in.registerMessage("foo", foo_struct.class, new MessageListener<foo_struct>() {
  public void messageReceived(String messageId, foo_struct messageData) {
    message_consumer.this.messageReceived(messageId, messageData);
  }
});
Python
In the constructor() method, register the expected message with a callback method:
self.port_message_in.registerMessage("foo", message_consumer_base.Foo, self.messageReceived)In the class, define the callback method. In this example, the method is called messageReceived():
def messageReceived(self, msgId, msgData):
  self._log.info("messageReceived *************************")
  self._log.info("messageReceived msgId " + str(msgId))
  self._log.info("messageReceived msgData " + str(msgData))